Scones have long been cherished in kitchens around the world, known for their delightful texture and versatility. Whether enjoyed with a cup of tea or as a sweet treat for breakfast, scones have a unique charm that makes them a beloved baked good. Their ability to adapt to various flavors has inspired countless recipes, and today, we’re excited to share a special twist on a classic favorite: Delightful Apple Pie Scones. This recipe merges the warm, comforting flavors of traditional apple pie with the tender, flaky texture of scones, creating a delightful treat that is perfect for any occasion.
The inspiration for these Delightful Apple Pie Scones comes from the nostalgic memories of sharing homemade apple pie with family and friends during festive gatherings. Imagine the sweet aroma of cinnamon-spiced apples wafting through the house, evoking a sense of warmth and comfort. By incorporating these flavors into scones, you can enjoy the essence of apple pie in a format that is easy to prepare and even easier to share. Whether you’re hosting an afternoon tea, looking for a unique dessert for a potluck, or simply craving a delicious snack with your morning coffee, these scones are sure to impress.
Understanding Scones: A Brief Overview
Scones have a rich history rooted in British cuisine, dating back to the early 16th century. Originally, scones were made with oatmeal and baked on griddles, but over time, they evolved into the buttery, flaky pastries we know today. Traditionally enjoyed with clotted cream and jam during tea time, scones have become a staple in both cafes and homes around the world.
One common point of confusion is the distinction between scones and other baked goods, such as biscuits and pastries. While scones are typically sweeter and denser than biscuits, they are more tender than traditional pastries, thanks to the use of cold butter and minimal mixing. This unique texture makes scones a favorite among both novice and experienced bakers, as they are relatively straightforward to prepare yet yield impressive results.
Ingredients Breakdown
To achieve the perfect Delightful Apple Pie Scones, understanding each ingredient’s role in the recipe is essential. Here’s a detailed look at the key components:
– All-Purpose Flour: The foundation of the scone, all-purpose flour provides the necessary structure. The right amount of flour helps achieve a balance between tenderness and stability, resulting in scones that hold their shape while remaining soft.
– Granulated Sugar vs. Brown Sugar: While granulated sugar adds sweetness, brown sugar brings a deeper, caramel-like flavor to the scones due to its molasses content. Using a combination of both sugars can enhance the overall taste and texture of the scones.
– Baking Powder: This leavening agent is crucial for achieving a light, fluffy texture. It helps the scones rise during baking, creating that desirable flaky consistency.
– Spices (Cinnamon and Nutmeg): Adding warmth and depth to the scones, spices like cinnamon and nutmeg are essential for evoking the classic flavors of apple pie. They complement the sweetness of the apples and add a cozy aroma to the baking process.
– Butter: The key to achieving a tender scone is using cold butter. When mixed into the dry ingredients, it creates small pockets of fat that lead to a flaky texture. The colder the butter, the better the scone will rise and the more tender it will be.
– Apples: Choosing the right variety of apples is critical for flavor and texture. Tart apples, such as Granny Smith or Honeycrisp, provide a nice contrast to the sweetness of the sugars and spices, ensuring the scones are well-balanced.
– Buttermilk: This ingredient adds acidity, which helps tenderize the dough and enhances flavor. The moisture from buttermilk also contributes to the scone’s light and airy texture.
– Egg: Serving as a binding agent, the egg not only helps hold the ingredients together but also enriches the dough, adding richness and moisture to the final product.
Step-by-Step Instructions: Getting Started
Before diving into the baking process, it’s important to set the scene by preheating your oven. This step is crucial for ensuring that your scones bake evenly and rise properly. Preheat your oven to 400°F (200°C) to create the ideal environment for baking.
Mixing Dry Ingredients
Once your oven is preheated, it’s time to gather your ingredients and start mixing. Begin by combining the all-purpose flour, granulated sugar, brown sugar, baking powder, cinnamon, and nutmeg in a large mixing bowl. Whisking these dry ingredients together ensures that the flavors are evenly distributed throughout the dough, preventing any clumps of baking powder or spices that could lead to uneven rising or flavor.
When mixing, it’s important to be gentle to avoid overworking the dough, which can lead to tough scones. The goal is to combine the ingredients just enough to ensure everything is evenly incorporated.
Cutting in the Butter
Next, you’ll want to cut in the cold butter until the mixture resembles coarse crumbs. You can use a pastry cutter, two forks, or your fingertips to achieve this. If you’re using your hands, be quick to avoid warming the butter too much. The key here is to leave small pieces of butter throughout the mixture, which will melt during baking and create that desired flakiness in the scones.
Incorporating the Apples
After the butter is incorporated into the dry mixture, it’s time to fold in the diced apples. Choose your favorite apple variety and peel, core, and chop them into small, bite-sized pieces. Gently mix the apples into the dough, taking care not to crush them. The goal is to distribute the apple pieces evenly so that each scone will have a delightful burst of flavor.
Adding the Wet Ingredients
In a separate bowl, combine the buttermilk and egg. Whisk until well blended, then pour the wet mixture into the dry ingredients. Using a spatula, gently fold the ingredients together until just combined. Be careful not to overmix, as this can lead to dense scones. The mixture should be slightly sticky but manageable.
As you prepare to shape your scones, you’ll notice the dough might seem a bit shaggy. This is perfectly normal! The moisture from the buttermilk and the butter will work together as the scones bake, resulting in a tender and moist final product.
With the initial steps completed, you are well on your way to creating a batch of Delightful Apple Pie Scones that are sure to impress. Stay tuned for the next part, where we will delve into shaping and baking these delicious treats, ensuring they turn out perfectly every time.
{{image_2}}
Cutting in Butter: Techniques for Achieving the Right Crumb Texture
The key to creating scones with a delightful crumb texture lies in how you cut in the butter. This process is essential because it allows the fat to coat the flour, creating a tender, flaky texture when baked. Here are some effective techniques to achieve the right crumb:
1. Chill Your Ingredients: Start by ensuring your butter is cold. If possible, freeze the butter for about 15 minutes before cutting it into small cubes. This will help maintain the integrity of the butter as you work it into the flour.
2. Use a Pastry Cutter: A pastry cutter or a fork is ideal for cutting in butter. Press the butter cubes into the flour mixture until you achieve a crumbly consistency. Aim for small, pea-sized pieces of butter that will melt during baking, creating steam and resulting in fluffy scones.
3. Avoid Overworking: While mixing, be gentle. The aim is to combine the ingredients without fully incorporating the butter. This method will ensure pockets of butter, leading to a light and airy texture.
4. Visual Indicators: Stop mixing once the mixture resembles coarse crumbs, with varying sizes of butter pieces still visible. This visual cue will guide you to the perfect crumb texture.
Incorporating Apples: Tips to Maintain Apple Integrity During Mixing
When it comes to adding apples to your scone mixture, maintaining their integrity is crucial for both flavor and texture. Here are some tips to achieve this:
1. Choose the Right Apples: Use firm apples like Granny Smith or Honeycrisp, which hold their shape well during baking. Avoid overly soft varieties as they can break down and turn mushy.
2. Chop Uniformly: Dice the apples into consistent pieces, about ½ inch in size. This not only helps them cook evenly but also ensures that they don’t overpower the scone’s delicate texture.
3. Gentle Folding: After combining the wet and dry ingredients, gently fold in the apples using a rubber spatula or wooden spoon. Avoid vigorous stirring, which can break down the apple pieces and alter the scone’s structure.
Combining Wet and Dry Mixtures: Best Practices to Avoid Overmixing
One of the biggest challenges in scone making is achieving the right balance between mixing and overmixing. Here are some best practices to follow when combining the wet and dry ingredients:
1. Gradual Addition: Add the wet ingredients—typically a mixture of milk and egg—slowly to the dry ingredients. This gradual approach allows you to monitor the mixture’s consistency more effectively.
2. Mix Until Just Combined: Stir until you no longer see dry flour. It’s okay if the mixture appears slightly shaggy; this indicates that you haven’t overworked the dough. Overmixing can lead to dense, tough scones rather than light and fluffy ones.
3. Use a Bench Scraper: If you’re working with a sticky dough, a bench scraper can be helpful for folding and turning the dough without needing to add more flour, which can lead to overmixing.
Shaping the Dough: Techniques for Dough Handling and Scoring
Once your dough is ready, shaping it properly is essential for achieving the desired scone shape and texture. Here’s how to do it:
1. Floured Surface: Lightly flour your work surface to prevent sticking. Turn the dough out onto the floured surface and pat it into a rectangle or circle about 1 inch thick.
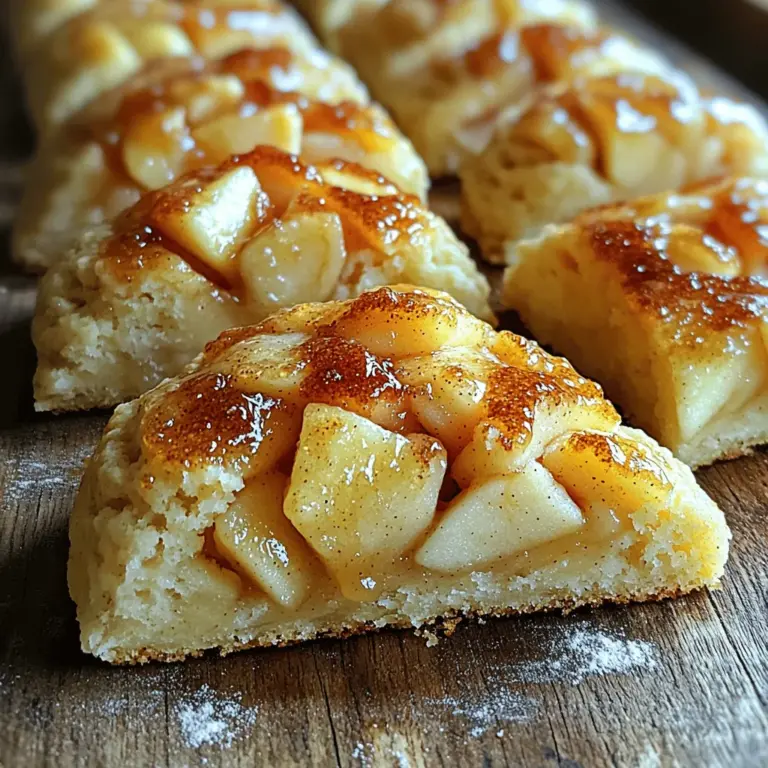
2. Cutting Shapes: Use a sharp knife or a pizza cutter to cut the dough into triangles or rounds. For triangles, cut the dough into four equal parts and then cut each part diagonally to create wedges. For rounds, use a biscuit cutter, ensuring you don’t twist as you cut to keep the edges straight.
3. Scoring: Lightly score the tops of the scones with a knife before baking. This not only adds a decorative touch but also allows steam to escape, helping the scones rise evenly.
Topping with Brown Sugar: The Impact on Flavor and Texture During Baking
One of the finishing touches that elevates your apple pie scones is the addition of brown sugar on top. Here’s how this simple step impacts your scones:
1. Flavor Enhancement: Brown sugar adds a rich, caramel-like flavor that complements the sweetness of the apples beautifully. It also provides a subtle depth that contrasts with the lightness of the scone.
2. Crunchy Texture: When baked, the brown sugar creates a slight crust on the surface of the scones, offering a delightful crunch that contrasts with the soft interior. This textural difference enhances the overall eating experience.
3. Application: Simply sprinkle a generous amount of brown sugar over the unbaked scones just before they go into the oven. This step is quick but significantly impacts the final product.
Baking Process: Recognizing Signs of Doneness, Like Color and Aroma
The baking process is crucial for achieving the perfect scone. Here’s what to look for to ensure your scones are done:
1. Golden Brown Color: As your scones bake, keep an eye on their color. They should turn a lovely golden brown on top, which typically indicates they are cooked through.
2. Aromatic Signals: The aroma of freshly baked scones should fill your kitchen. A sweet, buttery fragrance with hints of cinnamon (if included) is a good sign that your scones are nearing completion.
3. Firm Touch: Gently press the tops of the scones with your finger. They should spring back slightly and not feel overly soft or wet. If they feel too soft, allow them to bake a few more minutes.
Cooling and Garnishing: Enhancing Presentation and Flavor with Toppings
After baking, allow your scones to cool slightly before garnishing. Here are some tips for cooling and enhancing their presentation:
1. Cooling Rack: Transfer the scones to a wire cooling rack to allow air to circulate. This prevents the bottoms from becoming soggy and ensures even cooling.
2. Garnishing: For an elegant touch, consider drizzling a simple icing glaze made from powdered sugar and milk over the cooled scones. Alternatively, a dusting of powdered sugar adds a lovely visual appeal.
3. Flavor Enhancements: You can also top your scones with a dollop of clotted cream or a smear of apple butter, adding richness and complementing the apple flavor beautifully.
Serving Suggestions
When it comes to serving your delightful apple pie scones, presentation and accompaniments play a crucial role. Here are some ideas:
– Rustic Wooden Platter: Present your scones on a rustic wooden platter for a charming, homemade feel. This not only enhances the visual appeal but also makes for a great conversation starter at gatherings.
– Accompaniments: Serve the scones with honey or clotted cream on the side. The creaminess of clotted cream and the sweetness of honey pair perfectly with the warm, spiced flavors of the scones.
– Visual Enhancements: A light dusting of powdered sugar over the top of the scones creates an inviting presentation that is sure to impress guests.
– Beverage Pairings: Complement the flavors of your apple pie scones with beverages such as a warm cup of tea, rich coffee, or even a glass of apple cider. These pairings enhance the overall experience, making it a perfect afternoon treat.
Nutritional Information
As with any baked good, it’s important to consider the nutritional aspects of your scones. Here’s an overview:
– Calories and Nutritional Breakdown: Each scone typically contains around 250-300 calories, depending on the size and ingredients used. They provide a good balance of carbohydrates and fats, along with dietary fiber from the apples.
– Moderation and Mindfulness: While these scones are a delightful treat, it’s essential to enjoy them in moderation. Being mindful of portion sizes allows you to indulge without overdoing it.
Variations and Customizations
One of the best things about baking is the ability to customize recipes to suit your preferences. Here are some suggestions for variations and adaptations:
– Ingredient Substitutions: For those with dietary restrictions, consider using gluten-free flour in place of all-purpose flour. You can also swap in dairy-free butter and milk for a vegan option without sacrificing flavor.
– Flavor Variations: Experiment with different fruits like pears or cranberries. Adding nuts such as walnuts or pecans can provide an additional crunch, while spices like nutmeg or cardamom can elevate the flavor profile.
– Seasonal Adaptations: Adapt your scones throughout the year by using seasonal fruits or spices. In fall, consider adding pumpkin puree and warming spices, while in spring, fresh berries can provide a delightful twist.
Conclusion
In summary, these delightful apple pie scones are an exquisite blend of flavors and textures that embody the comfort of homemade baking. With their tender crumb, rich apple flavor, and a touch of sweetness from the brown sugar topping, they are sure to become a favorite in your household.
I encourage you to try this recipe and experience the joy of baking at home. Not only will you enjoy the delicious results, but you’ll also create lasting memories by sharing these scones with your loved ones. The communal aspect of baking brings people together, and there’s nothing quite like the joy of sharing homemade treats. So gather your ingredients, roll up your sleeves, and embark on this delightful baking adventure!