Introduction
Chocolate chip cookies are a beloved treat that has captured the hearts and taste buds of people around the world. Their rich, buttery flavor combined with the gooey, sweet morsels of chocolate creates a nostalgic experience that many associate with childhood memories of baking in the kitchen. Whether enjoyed fresh out of the oven or as a delightful accompaniment to a glass of milk, these cookies have secured their place in the pantheon of classic desserts.
The process of mastering the perfect chocolate chip cookie recipe is not just an endeavor for bakers; it is an art form that invites experimentation and personalization. Each batch can evoke different textures and flavors, leading to endless possibilities. Understanding the nuances of ingredients and techniques is essential for anyone looking to replicate the perfect cookie at home. This guide will explore the history, science, and essential ingredients behind chocolate chip cookies, culminating in a step-by-step recipe that will help you bake your way to cookie perfection.
Understanding the Basics of Chocolate Chip Cookies
History of Chocolate Chip Cookies
The chocolate chip cookie as we know it was invented in the 1930s by Ruth Wakefield, who owned the Toll House Inn in Massachusetts. According to legend, Ruth was attempting to create a batch of chocolate cookies when she decided to add chopped up pieces of a Nestle chocolate bar to her dough. Instead of melting completely, the chocolate softened into delightful pockets of sweetness, and the chocolate chip cookie was born. The recipe quickly gained popularity and eventually led to the creation of Nestle Toll House chocolate chips, forever linking the two in culinary history.
Since their inception, chocolate chip cookies have evolved into countless variations, from classic recipes to modern twists featuring unique flavors and ingredients. The enduring love for these cookies is a testament to their versatility and the joy they bring to both baking and sharing.
The Science Behind Baking: How Ingredients Interact
Baking is as much a science as it is an art. Understanding how ingredients interact can greatly influence the outcome of your cookies.
1. Flour: The backbone of your cookie dough, flour provides structure. The type of flour you use can impact the texture of your cookies. For example, all-purpose flour is commonly used, but using bread flour can create a chewier cookie due to its higher protein content.
2. Sugars: Different types of sugars behave differently when baked. Granulated sugar contributes to a crisper texture, while brown sugar adds moisture and a rich, caramel flavor due to its molasses content. A blend of both often yields the best results.
3. Butter: The type and temperature of butter play a crucial role in cookie texture. Room temperature butter creates a creamy, airy dough that results in a lighter cookie, while melted butter leads to denser, chewier cookies. Unsalted butter is typically preferred to control the salt content.
4. Eggs: Eggs bind the ingredients together, providing moisture and richness. They also add leavening, which creates a lighter texture. The number of eggs can be adjusted based on the desired density of the cookie.
5. Chocolate Chips: The choice of chocolate can greatly affect the flavor profile of your cookies. Semi-sweet chocolate is the classic choice, but dark chocolate offers a richer taste, while milk chocolate provides a sweeter flavor. White chocolate and even flavored chips can be exciting alternatives.
6. Optional Add-Ins: Ingredients like nuts, sea salt, or oats can elevate your cookies, adding texture and complexity. However, moderation is key to ensure they enhance rather than overpower the classic chocolate chip flavor.
Differences Between Various Chocolate Chip Cookie Styles
Chocolate chip cookies come in a variety of styles, each with its unique texture and flavor:
– Soft Cookies: These cookies are often thicker and chewy, achieved by using higher moisture content in the dough. They are typically underbaked slightly to retain their softness.
– Chewy Cookies: Chewy cookies strike a balance between soft and crispy, often using a combination of brown sugar and bread flour to achieve the desired texture.
– Crispy Cookies: For those who prefer a crunch, crispy cookies are baked longer and have a higher ratio of granulated sugar. They are thin and can be made with melted butter for added crispiness.
Understanding these differences allows bakers to customize their cookies to suit personal preferences or specific occasions.
Essential Ingredients for Chocolate Chip Cookies
To create the perfect batch of chocolate chip cookies, having the right ingredients on hand is crucial. Below is an overview of the key components that will contribute to your cookie success.
Flour: Types and Their Impact on Cookie Texture
Flour is the primary structure builder in cookies. Most recipes call for all-purpose flour, but experimenting with different types can yield various textures. For example, cake flour can create a softer, lighter cookie, while bread flour will result in a denser, chewier texture due to its higher protein content. It’s important to measure flour accurately to avoid overly dry or wet dough, which can drastically affect the baking process.
Sugars: The Roles of Granulated Sugar and Brown Sugar
Using a combination of granulated sugar and brown sugar is key to achieving the perfect balance of flavor and texture. Granulated sugar helps cookies spread out and become crisp, while brown sugar adds moisture and a rich, caramel-like flavor. Adjusting the ratio of these sugars can lead to different cookie styles, so consider your desired outcome when measuring.
Butter: Importance of Temperature and Type
Butter is not only a flavor enhancer but also a crucial ingredient that impacts texture. Use unsalted butter for better control over the salt in your cookies. Ensure the butter is at the right temperature; room temperature butter should be soft enough to leave an imprint when pressed, while melted butter will lead to a different cookie texture.
Eggs: Functions in Binding and Moisture
Eggs provide moisture and act as a binding agent in cookie dough. Typically, one large egg is used in most recipes. If you want a denser cookie, consider using just the egg yolk, which adds richness without the extra leavening from the egg white.
Chocolate Chips: Choosing the Right Type
The type of chocolate chips you choose can greatly influence the flavor of your cookies. Semi-sweet chocolate chips are the classic choice, but don’t hesitate to experiment with dark chocolate, which provides a more sophisticated taste, or milk chocolate for a sweeter treat. Additionally, consider using different shapes, such as chunks or discs, to create varied textures within your cookies.
Optional Add-Ins: Nuts, Sea Salt, and Other Flavor Enhancers
While chocolate chips are the star of the show, optional add-ins can enhance your cookies even further. Chopped nuts add a delightful crunch and richness, while a sprinkle of sea salt on top can elevate the flavors by balancing the sweetness. Other flavor enhancers, like vanilla extract, cinnamon, or even a hint of espresso powder, can create a unique twist on the traditional recipe.
Step-by-Step Instructions for Baking Chocolate Chip Cookies
Now that you have a solid understanding of the ingredients and their roles, it’s time to dive into the step-by-step process of baking chocolate chip cookies. Preparing your kitchen and gathering the necessary equipment will set you up for success.
Preparing the Kitchen and Gathering Equipment
Before you start baking, make sure your kitchen is clean and organized. Gather the following equipment:
– Mixing bowls (preferably one large and one medium)
– Measuring cups and spoons
– A whisk or hand mixer
– A spatula or wooden spoon for mixing
– Baking sheets lined with parchment paper or silicone baking mats
– An oven preheated to the right temperature (usually around 350°F or 175°C)
Mixing Dry Ingredients: Flour, Baking Soda, and Salt
Start by measuring out your dry ingredients. In a medium bowl, combine the flour, baking soda, and salt. Whisk them together to ensure they are evenly mixed. This step is important because it helps distribute the leavening agent (baking soda) evenly throughout the flour, ensuring uniform rising in the cookies.
Creaming Butter and Sugars: Techniques for a Perfect Blend
In a large mixing bowl, add your room temperature butter along with both the granulated and brown sugars. Using a hand mixer or a whisk, cream the mixture together until it becomes light and fluffy. This process incorporates air into the mixture, which is crucial for achieving a light texture in your cookies. The creaming process typically takes about 2-3 minutes.
Adding Eggs and Vanilla: Enhancing Flavor and Texture
Once your butter and sugars are well combined, it’s time to incorporate the eggs and vanilla extract. Add one egg at a time, mixing well after each addition to ensure they are fully incorporated. The vanilla extract will enhance the overall flavor of your cookies, adding a warm, aromatic quality that complements the chocolate.
Incorporating Dry Ingredients: Avoiding Overmixing
Now that your wet ingredients are ready, it’s time to combine them with the dry ingredients. Gradually add the dry mixture to the wet mixture, stirring gently with a spatula or wooden spoon. Be careful not to overmix; you want to combine the ingredients just until the flour is incorporated. Overmixing can lead to tough cookies, so stop as soon as you see no dry flour.
With these steps, you are well on your way to creating the perfect chocolate chip cookies. The next part of this guide will delve deeper into the finishing touches and baking process, ensuring your cookies turn out deliciously every time.
{{image_2}}
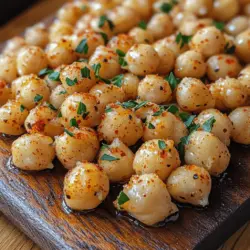
Folding in Chocolate Chips: Ensuring Even Distribution
Once your chickpea snack mixture is ready, it’s time to fold in the chocolate chips. This step is crucial for achieving that delightful crunch and sweetness with every bite. Use a rubber spatula or a wooden spoon to gently fold the chocolate chips into the mixture. Be careful not to overmix; the goal is to have the chocolate evenly distributed without breaking down the chickpeas further. This careful folding technique will ensure a perfect balance of flavors in your Crunchy Ranch Chickpea Snack.
Baking Techniques for Perfect Cookies
To achieve the ultimate Crunchy Ranch Chickpea Snack, mastering basic baking techniques is essential. Here’s what you need to know to get the best results.
Preheating the Oven: Why It’s Crucial
Preheating your oven is a vital step that should never be overlooked. It ensures that your snacks bake evenly from the moment they enter the oven. Set your oven to the recommended temperature and allow it to reach this temperature before placing your baking sheet inside. Not only does this help in achieving the perfect crunch, but it also contributes to the texture and flavor development of your chickpea snacks.
Choosing the Right Baking Sheet: Materials and Sizes
The type of baking sheet you use can significantly impact your baking results. For the Crunchy Ranch Chickpea Snack, consider using a rimmed baking sheet. This design helps contain any spills while also allowing for even heat distribution. Opt for a non-stick or parchment-lined baking sheet to prevent the snacks from sticking and to ensure easy cleanup. If you prefer a crispier texture, a metal baking sheet will work better than a glass or ceramic one, as metal conducts heat more effectively.
Portioning Dough: Techniques for Uniform Cookies
Uniformity is key to ensuring that all your chickpea snacks cook evenly. Use a cookie scoop or a tablespoon to portion out the mixture onto the baking sheet. Leave enough space between each mound to allow for spreading. This technique not only enhances the appearance of your snacks but also helps them to bake uniformly, resulting in a perfect crunch throughout.
Baking Times and Temperatures: Finding the Sweet Spot for Your Oven
Baking times can vary based on your oven and the size of your chickpea snack portions. A good rule of thumb is to start checking for doneness a few minutes before the recommended baking time. For Crunchy Ranch Chickpea Snacks, a baking time of about 25-30 minutes at 400°F (200°C) is typical. Look for a golden brown color and a firm texture. If your snacks appear undercooked, give them an additional few minutes in the oven, but be cautious not to overbake, as this can lead to a dry texture.
Cooling Cookies: Importance of Cooling Racks and Timing
Once your snacks are baked to perfection, it’s time to cool them. Allowing your Crunchy Ranch Chickpea Snacks to cool on the baking sheet for about 5-10 minutes is beneficial as this helps them to set. Afterward, transfer them to a wire cooling rack. Cooling racks allow air to circulate around the snacks, preventing sogginess and ensuring they stay crunchy. Patience is key here; let them cool completely before diving in.
Common Mistakes to Avoid While Baking
Even the most seasoned bakers can fall prey to common mistakes. Here are a few pitfalls to avoid while preparing your Crunchy Ranch Chickpea Snack.
Overmixing the Dough: Understanding the Consequences
While mixing is essential for combining ingredients, overmixing can lead to a dense and tough texture. This is particularly critical when working with chickpeas, which can easily break down into a mushy consistency if mixed too vigorously. Aim for just combined ingredients for a light and crunchy texture.
Incorrect Oven Temperature: How to Check and Adjust
An oven that runs too hot or too cool can ruin your snacks. Invest in an oven thermometer to check your oven’s accuracy. If you find discrepancies, adjust the temperature accordingly. Remember, baking is a science, and even a slight deviation can impact your final product.
Not Measuring Ingredients Accurately: The Impact on Results
Precision in measuring ingredients is crucial for baking success. Use the appropriate measuring cups and spoons, and ensure that dry ingredients, such as flour or spices, are leveled off for accuracy. For liquids, always use a clear measuring cup with measurements marked on the side. This attention to detail ensures that your Crunchy Ranch Chickpea Snack achieves the perfect flavor and texture.
Skipping the Chill: Benefits of Refrigerating Dough
Chilling your dough before baking can enhance the flavors and improve the texture of your snacks. If time allows, refrigerate your chickpea mixture for at least 30 minutes before portioning and baking. This step helps to firm up the dough, making it easier to work with and improving the final crunchiness of your snacks.
Variations on the Classic Crunchy Ranch Chickpea Snack Recipe
Baking is all about creativity! Here are some delightful variations on the classic Crunchy Ranch Chickpea Snack to suit various dietary needs and preferences.
Gluten-Free Options: Adapting the Recipe for Dietary Needs
If you’re looking to make your Crunchy Ranch Chickpea Snack gluten-free, simply ensure that all ingredients, including ranch seasoning and any other flavorings, are certified gluten-free. You can also consider substituting any breadcrumbs or flour with gluten-free alternatives like almond flour or chickpea flour, maintaining that crunchy texture while catering to gluten sensitivities.
Vegan Crunchy Ranch Chickpea Snacks: Substituting Ingredients for a Plant-Based Version
To make your Crunchy Ranch Chickpea Snack vegan, check that your ranch seasoning is free from dairy products. You can create your own vegan ranch seasoning using dried herbs, garlic powder, onion powder, and nutritional yeast to add a cheesy flavor without any dairy. This not only keeps the snack plant-based but also enhances its flavor profile.
Creative Flavor Variations: Adding Spices, Extracts, or Unique Mix-Ins
Elevate your Crunchy Ranch Chickpea Snack by experimenting with different flavors. Add a pinch of cayenne pepper for a spicy kick or toss in some smoked paprika for a smoky flavor. Consider incorporating unique mix-ins such as sunflower seeds, pumpkin seeds, or even a sprinkle of cinnamon for a sweet twist. The possibilities are endless, allowing you to tailor your snacks to suit your taste preferences perfectly.
Storing and Freezing Crunchy Ranch Chickpea Snacks
Once your Crunchy Ranch Chickpea Snacks are baked and cooled, proper storage is key to keeping them fresh and tasty.
Best Practices for Storing Baked Snacks: Keeping Them Fresh
Store your cool Crunchy Ranch Chickpea Snacks in an airtight container at room temperature. They can last up to a week if stored properly. If you notice any moisture, place a piece of bread in the container to keep them crunchy for longer.
How to Freeze Cookie Dough: Steps for Long-Term Storage
If you want to bake in batches, freezing the dough is an excellent option. Portion the chickpea mixture into individual mounds and place them on a baking sheet to freeze until solid. Once frozen, transfer them to a zip-top freezer bag, removing as much air as possible before sealing. They can be stored for up to three months. When you’re ready to bake, simply add a few extra minutes to the baking time, and enjoy freshly baked snacks whenever the craving hits.
Reheating Snacks for Optimal Texture
If you have leftover Crunchy Ranch Chickpea Snacks, you can revive their crunch by reheating them. Preheat your oven to 350°F (175°C) and spread the snacks on a baking sheet. Bake for about 5-10 minutes, checking frequently to ensure they don’t burn. This quick reheating will restore their delightful crunch and flavor.
Conclusion
Baking Crunchy Ranch Chickpea Snacks is not just about the end result; it’s about the joy and satisfaction that comes from creating something delicious. Whether you’re enjoying them as a healthy snack or offering them at a gathering, these chickpea treats are sure to impress. Remember to experiment with the recipe, adding your unique twists and variations along the way. The timeless appeal of this crunchy, savory snack makes it a favorite for many, and with these tips and techniques, you can confidently create a batch that’s perfect every time. Happy baking!