Introduction
Lasagna is more than just a dish; it’s a culinary celebration that embodies the heart and soul of Italian cuisine. This beloved Italian classic has won its place at tables around the world, often gracing festive gatherings, family dinners, and cozy evenings alike. With its layers of rich flavors and comforting textures, lasagna is a dish that brings people together, creating lasting memories with each bite.
The cultural significance of lasagna in Italy is profound. Originating from the region of Emilia-Romagna, this dish reflects the Italian ethos of using simple, high-quality ingredients to create something truly extraordinary. Lasagna has traveled through the ages, evolving into various forms that highlight regional ingredients and cooking techniques, each telling a story of its own.
In this article, we will delve deep into the art of making classic lasagna at home. From understanding its rich history and cultural importance to gathering the essential ingredients and mastering the preparation steps, this guide aims to equip you with everything you need to create a lasagna that is both authentic and delicious. Whether you are a novice cook or a seasoned chef, the following sections will inspire you to layer perfection onto your plate.
Understanding Lasagna
The History of Lasagna
The origins of lasagna can be traced back to ancient times, with references to layered dishes appearing in various cultures. The Greeks and Romans were known to create dishes that resembled what we now recognize as lasagna, using layers of pasta interspersed with meat and sauce. However, the modern interpretation of lasagna as we know it today took shape in Naples during the Middle Ages, where the dish began to evolve into its current format.
Over the centuries, lasagna has undergone significant changes, adapting to local ingredients and preferences. In the 19th century, the introduction of ricotta cheese and béchamel sauces marked a turning point in lasagna’s evolution, leading to the creamy, cheesy layers we cherish today. Each region of Italy boasts its own unique take on this classic dish, with variations that reflect local flavors and traditions. From the meaty ragu of Bologna to the vegetarian options found in the coastal regions, lasagna continues to be a canvas for culinary creativity.
What Makes the Perfect Lasagna
The perfect lasagna is a harmonious blend of flavors, textures, and high-quality ingredients. To achieve this layered perfection, several key elements must come together seamlessly.
1. Quality Ingredients: The foundation of any excellent lasagna is the quality of its ingredients. Freshly made pasta, ripe tomatoes, and high-quality cheeses can elevate the dish from ordinary to extraordinary. When possible, opt for homemade sauces and locally sourced produce to enhance the overall flavor profile.
2. Layers and Textures: A well-made lasagna should offer a delightful contrast of textures. The pasta should be tender yet firm, while the meat sauce should be rich and hearty. Creamy cheeses like ricotta and mozzarella add a luscious mouthfeel, making each bite a delightful experience.
3. Balancing Flavors: Achieving balance between the meat, cheese, and sauce is crucial. The meat sauce should be seasoned to perfection, with herbs such as basil and oregano adding depth. The cheeses must complement the sauce without overpowering it, creating a symphony of flavors that unfolds with every layer.
Ingredients for Classic Lasagna
Essential Ingredients
To create an authentic classic lasagna, a selection of traditional ingredients is essential. Here’s a breakdown of what you’ll need:
1. Types of Pasta: The foundation of your lasagna begins with the pasta. You can choose between fresh or dried lasagna sheets. Fresh pasta offers a tender bite and can be made in advance, while dried sheets are convenient and readily available. Both options have their merits, and the choice often depends on your personal preference and availability.
2. Meat Options: Ground beef and pork are the most common choices for the meat sauce, providing a rich flavor that pairs beautifully with the other ingredients. For a vegetarian alternative, consider using lentils or a mix of sautéed vegetables to create a hearty filling that still captures the essence of lasagna.
3. Cheese Selection: The cheese component is vital in achieving the creamy layers that characterize lasagna. A combination of ricotta, mozzarella, and parmesan creates a delightful balance of flavors. Ricotta provides creaminess, mozzarella offers stretch and melt, while parmesan adds a sharp and salty note that enhances the overall dish.
Secret Ingredients for Enhanced Flavor
To take your lasagna to the next level, consider incorporating some secret ingredients that can enhance the overall flavor:
1. Herbs and Spices: Fresh or dried herbs such as basil, oregano, and thyme can add incredible depth to your meat sauce. Garlic is another essential flavor enhancer that can elevate the dish, bringing aromatics that complement the other ingredients.
2. Homemade vs. Store-Bought Sauces: While store-bought sauces can be convenient, nothing beats the flavor of a homemade marinara or béchamel sauce. Taking the time to prepare your sauces allows you to control the seasoning and quality of the ingredients, resulting in a more flavorful lasagna.
3. Optional Additions: Feel free to get creative with your lasagna by adding optional ingredients like spinach, mushrooms, or roasted red peppers. These additions not only enhance the flavor but also add nutritional value and texture to the dish.
Preparation Steps for Lasagna
Creating a classic lasagna requires a series of steps that, while detailed, are straightforward enough for any home cook to master. Here’s how to prepare for making your lasagna:
Preparing the Meat Sauce
The first step in creating a rich and flavorful lasagna is to prepare the meat sauce.
1. Choosing the Right Meat and Cooking Method: Select high-quality ground meat, such as beef, pork, or a combination of both. For a vegetarian version, opt for lentils or finely chopped vegetables. Begin by browning the meat in a large skillet over medium heat until it develops a deep brown color. This step is crucial for building flavor.
2. Steps for Making a Rich, Flavorful Sauce: Once the meat is browned, drain excess fat if necessary, then add chopped onions, garlic, and any other aromatics. Sauté until softened. Next, incorporate canned tomatoes, tomato paste, and your choice of herbs and spices. Allow the sauce to simmer gently for at least 30 minutes, which will deepen the flavors and allow the sauce to thicken.
3. Simmering Time for Optimal Flavor Development: The longer you let your meat sauce simmer, the more the flavors will meld together. Aim for at least 30 minutes, but if time allows, let it simmer for an hour or more for a truly rich and hearty sauce.
Making the Cheese Mixture
While the meat sauce is simmering, you can prepare the cheese mixture that will add creaminess to your lasagna.
1. Combining Ricotta, Egg, and Seasonings: In a mixing bowl, combine ricotta cheese with one or two eggs, salt, pepper, and a handful of fresh or dried herbs. The egg helps bind the mixture, ensuring that it holds up well in the layers.
2. Tips for Achieving the Right Consistency: The cheese mixture should be creamy but not too runny. If it seems too loose, consider adding a bit more ricotta or even a splash of grated parmesan to thicken it. Taste and adjust the seasoning as needed.
Cooking the Lasagna Noodles
If you’re using dried lasagna sheets, be sure to cook them according to the package instructions until they are al dente. Fresh pasta may not need pre-cooking, as it will soften during the baking process.
1. Boiling the Noodles: If cooking dried noodles, bring a large pot of salted water to a boil. Add the noodles and cook until they are slightly firm, ensuring they won’t become mushy during baking. Drain and rinse with cold water to stop the cooking process.
2. Layering the Lasagna: Once all components are prepared, you can begin assembling your layers. Start with a layer of meat sauce at the bottom of your baking dish, followed by a layer of noodles, a layer of the cheese mixture, and a sprinkle of mozzarella. Repeat the process until all ingredients are used, finishing with a layer of sauce topped with mozzarella and parmesan for a golden, bubbly crust.
By following these steps, you’re well on your way to creating a classic lasagna that will impress your family and friends. The combination of rich meat sauce, creamy cheese layers, and tender pasta creates a dish that is not only satisfying but also a true labor of love.
As you embark on this culinary journey, remember that lasagna is all about patience and attention to detail. Each layer is an opportunity to showcase your cooking skills and passion for Italian cuisine. In the next section, we’ll explore variations of lasagna, offering creative twists on this timeless dish that you can try at home.
{{image_2}}
Boiling vs. No-Boil Noodles: Pros and Cons
When it comes to making a delightful bowl of Fragrant Lemongrass Chicken Pho, the choice of noodles can significantly impact the final dish. Two common options are boiled rice noodles and no-boil rice noodles. Each has its advantages and disadvantages.
Boiled Noodles:
– Pros: Boiled noodles give you greater control over the cooking process. You can achieve the desired level of tenderness, which is crucial for the texture of pho. They also absorb flavors from the broth more effectively.
– Cons: The main drawback is the potential for sticking if not handled properly. You’ll need to rinse them thoroughly post-cooking to prevent clumping.
No-Boil Noodles:
– Pros: No-boil noodles offer convenience. They save time and are easy to use, as they can be added directly to the broth without pre-cooking. This method also minimizes cleanup.
– Cons: The downside is that they may not absorb the broth’s flavors as effectively, leading to a less cohesive dish. Additionally, they can sometimes become mushy if overcooked in the broth.
Making the right choice depends on your cooking style and the time you have available. If you prefer a traditional approach, boiled noodles might be the way to go. However, if you’re short on time, no-boil options can still yield a satisfying bowl of pho.
Tips for Preventing Sticking and Ensuring Even Cooking
Regardless of the noodle type you choose, here are some essential tips to ensure your noodles cook perfectly without sticking together:
1. Use Plenty of Water: When boiling noodles, always use a large pot of water. This helps maintain the temperature and prevents the noodles from clumping.
2. Salt Your Water: Just like pasta, salting the water enhances the flavor of the noodles. It’s recommended to add about one tablespoon of salt to every four quarts of water.
3. Rinse After Cooking: If using boiled noodles, immediately rinse them under cold water after draining. This stops the cooking process and prevents sticking.
4. Oil the Noodles: A light coating of oil can help prevent sticking. Toss your drained noodles with a teaspoon of sesame oil or any neutral oil before adding them to your broth.
5. Stir Occasionally: If you’re using no-boil noodles in your broth, stir them occasionally to prevent clumping as they soften.
Assembling the Pho
Once your broth is prepared and your noodles are ready, it’s time to assemble your Fragrant Lemongrass Chicken Pho. The assembly process is crucial for achieving balanced flavor and texture.
Layering Techniques for Balanced Flavor and Texture
1. Start with Broth: Begin by pouring a ladle of the hot, aromatic broth into your serving bowl. This creates a flavorful base.
2. Add Noodles: Gently place the boiled or no-boil noodles into the bowl, ensuring they are submerged in the broth.
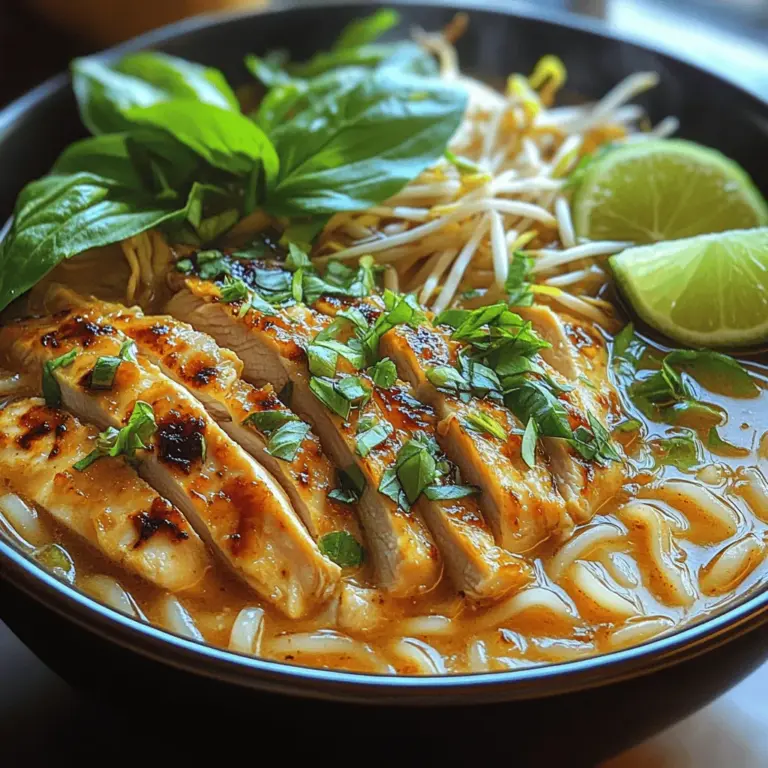
3. Layer the Chicken: Next, add your cooked lemongrass chicken. The warm chicken not only enhances the overall flavor but also helps to heat the noodles.
4. Fresh Herbs and Vegetables: Top the bowl with fresh herbs such as cilantro and Thai basil. Thinly sliced onions and bean sprouts can add a crisp texture and freshness.
5. Garnishes: Finish with lime wedges and sliced chili peppers on the side, allowing each diner to customize their bowl to taste.
The Order of Layers: Sauce, Noodles, Chicken, Repeat
While the assembly is straightforward, following the right order can make a significant difference in the overall experience. Here’s a quick rundown:
1. Broth: Start with a good amount of broth to ensure the noodles soak up the flavors.
2. Noodles: Layer your noodles evenly so every bite contains a balance of broth and chicken.
3. Chicken: The chicken should be added on top of the noodles, allowing the heat from the broth to keep it warm.
4. Herbs and Vegetables: These should be placed last, maintaining their freshness and vibrant colors for an appealing presentation.
Tips for Preventing Sogginess
To ensure your pho maintains its delicious, fresh flavors and textures, keep these tips in mind:
– Serve Immediately: Pho is best enjoyed fresh. Serve the assembled bowls right away to prevent the noodles from absorbing too much broth and becoming soggy.
– Control Broth Temperature: Keep the broth hot but not boiling when serving, as boiling can make the noodles mushy.
– Separate Components: If preparing ahead of time, consider storing noodles, chicken, and broth separately until serving to maintain optimal textures.
Baking Your Pho
While pho is traditionally served fresh, there are times when you might want to prepare components in advance or make a large batch. Here’s how to manage your cooking process effectively.
Preheating and Broth Preparation
Start by ensuring your broth is piping hot. If you’ve prepared it in advance, reheat it gently on the stove to avoid compromising its flavor.
Ideal Temperature for Serving Pho
Pho is ideally served at a temperature of around 180°F to 200°F (82°C to 93°C). This temperature range allows the noodles and chicken to warm without cooking further.
Using Foil to Prevent Over-Browning
While traditional pho doesn’t require baking, if you’re preparing a baked variation (like a casserole-style pho), cover it with foil during the first half of baking to prevent excessive browning.
Serving Suggestions
When it comes to serving your Fragrant Lemongrass Chicken Pho, the presentation and accompanying dishes can elevate the meal to a whole new level.
Ideal Pairings
Pho is a dish that pairs well with various sides and beverages. Here are a few suggestions:
– Salads: A light cucumber salad or a Vietnamese green mango salad can provide a refreshing contrast to the warm broth.
– Garlic Bread: While not traditional, a piece of crusty garlic bread can complement the flavors nicely.
– Wines: Light white wines or even a sparkling water with lime can cleanse the palate and enhance the dining experience.
Presentation Tips for Beautiful Serving
1. Use Clear Bowls: Consider serving your pho in clear bowls to showcase the colorful layers of ingredients.
2. Garnish Generously: Fresh herbs and lime wedges should be artfully arranged to entice the senses.
3. Serve with Sides: Present each bowl with a small plate of fresh herbs, lime, and chili on the side for a personalized touch.
Storing and Reheating Leftovers
If you find yourself with leftover pho, here are the best practices for storage and reheating:
Best Practices for Refrigerating and Freezing
– Separate Components: Store broth, noodles, and chicken in separate airtight containers to maintain their individual textures.
– Cooling: Allow the broth to cool to room temperature before refrigerating or freezing to avoid condensation and spoilage.
How to Reheat Without Losing Flavor
1. Broth: Reheat the broth on the stove over medium heat until it reaches a rolling boil.
2. Noodles: If using boiled noodles, briefly submerge them in boiling water to warm them up. For no-boil noodles, you can add them directly to the reheated broth, allowing them to soften as the broth returns to temperature.
3. Chicken: Add the chicken to the broth in the last few minutes to warm it through.
Variations of Classic Pho
While the traditional Fragrant Lemongrass Chicken Pho is delightful as is, don’t hesitate to experiment with variations to suit your taste.
Vegetarian Pho Options
For a vegetarian version, consider substituting the chicken with tofu or tempeh. Use vegetable broth infused with lemongrass and additional vegetables like mushrooms and bok choy for added flavor.
Gluten-Free Pho
To make a gluten-free version, ensure that your noodles are certified gluten-free, and use tamari or coconut aminos instead of soy sauce if desired.
International Twists
Pho can be creatively adapted to include flavors from various cuisines. For instance, try a Mexican-inspired pho with tortillas or an Asian twist using rice noodles topped with stir-fried vegetables.
Conclusion
Making homemade Fragrant Lemongrass Chicken Pho is not just about following a recipe; it’s about embracing the process and enjoying the warmth and comfort of a classic dish. The joy of preparing this aromatic soup lies in the layers of flavor and the satisfaction of sharing it with family and friends.
As you perfect your pho, don’t hesitate to experiment with variations and make the recipe your own. Whether you stick to the traditional method or explore creative adaptations, every bowl is an opportunity to express your culinary creativity. Enjoy the journey and the delightful flavors of your homemade pho!