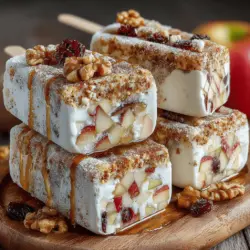
Frosty Apple-Pie Yogurt Bars: A Deliciously Healthy Treat
In the realm of healthy snacking, few treats are as delightful and refreshing as Frosty Apple-Pie Yogurt Bars. Combining the creamy goodness of Greek yogurt with the wholesome flavors of apples and spices, these bars are a perfect blend of nutrition and indulgence. Whether you’re looking for a cool snack on a hot day or a nutritious dessert to satisfy your sweet tooth, these yogurt bars are an excellent choice. They not only offer a delectable taste but also pack a punch in terms of health benefits, making them a fitting addition to your snack repertoire.
A Brief Background on Yogurt Bars
Yogurt bars have gained popularity over the years as a convenient and nutritious snack option. The combination of yogurt with various fruits and spices allows for endless flavor profiles, catering to different taste preferences and dietary restrictions. The Frosty Apple-Pie Yogurt Bars take inspiration from traditional apple pie, a classic dessert that many love. By transforming this beloved dessert into a healthier, portable form, these bars offer a guilt-free way to enjoy the flavors of fall any time of the year.
Moreover, the yogurt bars are incredibly versatile. They can be enjoyed at breakfast, as a midday snack, or even as a light dessert after dinner. The simplicity of the recipe means you can whip up a batch in no time, making them a go-to option for busy families or anyone seeking healthier snack alternatives.
Understanding the Ingredients
To create the perfect Frosty Apple-Pie Yogurt Bars, it’s essential to understand the role of each ingredient. This not only ensures that your bars are delicious but also maximizes their nutritional value.
The Role of Greek Yogurt: A Creamy Base Rich in Protein
Greek yogurt serves as the foundation for these bars. Unlike regular yogurt, Greek yogurt is strained to remove excess whey, resulting in a thicker consistency and higher protein content. This protein-rich base not only helps keep you satiated but also contributes to muscle repair and growth. Furthermore, Greek yogurt is a great source of probiotics, which promote gut health. When choosing Greek yogurt for this recipe, opt for plain, unsweetened varieties to control the sweetness and avoid added sugars.
Sweeteners: Honey vs. Maple Syrup – Which is Best for You?
When it comes to sweetening your Frosty Apple-Pie Yogurt Bars, honey and maple syrup are two popular options. Both natural sweeteners add a touch of sweetness without the refined sugars found in many processed foods. Honey has antibacterial properties and is known for its antioxidant benefits, while maple syrup provides essential minerals such as zinc and manganese. The choice between the two often comes down to personal preference and dietary considerations. For those who are vegan, maple syrup would be the better option.
Applesauce: The Unsung Hero of Moisture and Flavor
Applesauce is another key ingredient that adds moisture and flavor to the bars. It not only enhances the apple-pie taste but also acts as a natural sweetener, reducing the need for additional sugars. When selecting applesauce, look for unsweetened varieties to maintain control over the sweetness of the final product. Applesauce is also rich in dietary fiber, which aids in digestion and promotes a feeling of fullness.
Spice it Up: The Health Benefits of Cinnamon and Nutmeg
No apple pie is complete without spices, and the inclusion of cinnamon and nutmeg in these yogurt bars adds warmth and depth of flavor. Cinnamon is known for its ability to regulate blood sugar levels and has anti-inflammatory properties. Nutmeg, on the other hand, contains antioxidants and has been linked to improved digestion. Together, these spices not only enhance the flavor profile but also provide a host of health benefits, making them a perfect addition to your recipe.
Oats and Nuts: Adding Texture and Nutritional Value
To give your Frosty Apple-Pie Yogurt Bars a satisfying texture, oats and nuts are included in the mix. Oats are a fantastic source of whole grains, providing essential nutrients such as fiber, iron, and B vitamins. They help keep you full longer and can stabilize blood sugar levels. Nuts, whether almonds, walnuts, or pecans, add a delightful crunch and are packed with healthy fats, protein, and vitamins. When incorporating oats and nuts, consider toasting them lightly to enhance their flavor and crunchiness.
Optional Additions: Enhancing Flavor with Raisins
While the base recipe is already delicious, consider adding raisins for an extra layer of flavor and natural sweetness. Raisins complement the apple pie flavor and provide additional fiber and antioxidants. However, this is entirely optional, and you can customize the recipe based on your preferences.
Step-by-Step Preparation
Now that you understand the ingredients, it’s time to delve into the preparation process for your Frosty Apple-Pie Yogurt Bars. This section will guide you through the initial steps, ensuring that your bars turn out perfect every time.
Preparing the Apple Mixture
The first step in creating your Frosty Apple-Pie Yogurt Bars is preparing the apple mixture. This not only involves selecting the right apples but also infusing them with flavors that will elevate your bars.
Selecting the Right Apples: Sweet vs. Tart Varieties
When it comes to choosing apples, consider the balance of sweetness and tartness. For a traditional apple pie flavor, a combination of sweet and tart apples is often best. Varieties such as Granny Smith, Honeycrisp, and Fuji provide a delightful contrast that enhances the overall taste. If you prefer a sweeter bar, you might lean more towards sweeter apples, while those who enjoy a tangy flavor can opt for tart varieties.
Flavor Infusion: The Importance of Lemon Juice and Spices
To enhance the flavors of your apples, adding a splash of lemon juice is essential. The acidity from the lemon juice brightens the apple flavor and prevents browning. Additionally, incorporating your chosen spices—cinnamon and nutmeg—into the apple mixture will ensure that every bite of your yogurt bars bursts with flavor. When preparing the apples, consider sautéing them briefly with the spices to release their natural sugars and aromas, creating a more intense flavor profile.
Creating the Yogurt Base
After preparing your apple mixture, the next step is to create the yogurt base that will hold everything together.
Whisking Techniques for a Smooth Mixture
In a large mixing bowl, combine your Greek yogurt with the chosen sweetener—honey or maple syrup—and whisk thoroughly. This step is crucial to ensure a smooth and creamy texture. If you find that your yogurt is too thick, a splash of milk or water can help achieve the desired consistency. Whisking vigorously will also help incorporate air, resulting in a lighter texture for your bars.
Adjusting Sweetness: How to Tailor to Your Taste
Before moving forward, it’s essential to taste your yogurt base. Adjust the sweetness to your liking by adding more honey or maple syrup as needed. Remember, the sweetness will be complemented by the applesauce and the natural sugars in your chosen apples, so be mindful of how sweet you want your final product to be.
Incorporating Applesauce and Adding Texture
The final step in preparing your yogurt base involves incorporating the applesauce and adding texture through oats and nuts.
Mixing Techniques: Ensuring Even Distribution of Ingredients
Gently fold the prepared applesauce into the yogurt mixture, ensuring that it is evenly distributed throughout. Be careful not to overmix, as this could compromise the creamy texture of your yogurt base. Next, add in your oats and nuts, stirring until everything is well combined. This step not only enhances the texture but also boosts the nutritional profile of your yogurt bars.
The Benefits of Oats and Nuts in Your Diet
Including oats and nuts in your recipe not only adds a satisfying crunch but also contributes to a balanced diet. Oats are high in fiber, promoting digestive health, while nuts are a great source of healthy fats, protein, and essential vitamins. Together, they create a nutrient-dense snack that will keep you feeling energized and satisfied.
With the apple mixture and yogurt base prepared, you’re now ready to move on to the next steps in crafting your Frosty Apple-Pie Yogurt Bars. The combination of creamy yogurt, sweet apples, and warm spices promises a deliciously satisfying treat that you won’t want to miss. Keep reading to explore the remaining steps and tips for freezing and serving your delightful yogurt bars.
{{image_2}}
Combining the Mixtures for the Perfect Bar
To create the ideal Frosty Apple-Pie Yogurt Bars, it’s crucial to combine the yogurt and apple pie filling mixtures effectively. This process ensures that each bar is bursting with flavor and has the perfect texture, making every bite delightful.
Techniques for Gentle Folding: Preserving Texture and Flavor
When combining the yogurt mixture with the apple pie filling, the key is to use gentle folding techniques. This method helps to maintain the light and airy texture of the yogurt while incorporating the apple filling without breaking down the yogurt’s structure.
1. Use a Rubber Spatula: Start by placing the yogurt mixture in a large mixing bowl. Using a rubber spatula, add the apple filling gradually.
2. Fold, Don’t Stir: Instead of stirring vigorously, which can deflate the yogurt, gently fold the two mixtures together. This involves scraping the spatula along the bottom of the bowl and lifting the yogurt over the apple filling, repeating until just combined.
3. Check for Uniform Color: You want the mixture to be evenly distributed without any large clumps of yogurt or apple filling remaining. The goal is a beautifully swirled mixture that showcases both the creamy yogurt and the vibrant apple pie filling.
Freezing and Serving Your Yogurt Bars
Once you have your mixtures combined, it’s time to prepare for freezing and serving these delicious bars.
Preparing the Baking Dish
Optimal Baking Dish Sizes and Parchment Paper Usage
Choosing the right baking dish is essential for getting the proper thickness and texture in your yogurt bars. A 9×9 inch square baking dish is ideal for this recipe, ensuring the bars are thick enough to hold together but not too thick to freeze evenly.
– Parchment Paper: Line your baking dish with parchment paper, allowing some overhang on the sides. This will make it easy to lift the bars out once they are frozen. It also prevents sticking, ensuring a clean release for perfect slices.
How to Ensure Easy Removal of Bars
After pouring your combined yogurt and apple mixture into the prepared baking dish, gently spread it out evenly using the spatula. Tap the dish lightly on the countertop to eliminate any air bubbles, which helps to achieve a smooth surface. Once you are satisfied with the evenness, place it in the freezer.
Freezing Process: Timing and Temperature
The freezing process is crucial for achieving the right texture for your yogurt bars. Here’s what you need to know:
– Timing: Freeze the yogurt mixture for at least 4-6 hours, or until it is completely solid. For best results, overnight freezing is recommended, allowing the bars to set thoroughly.
– Temperature: Ensure your freezer is set to 0°F (-18°C) or colder. This ensures the yogurt mixture freezes evenly and maintains its creamy texture without becoming icy.
Slicing and Serving Suggestions
Once your bars are fully frozen and ready to serve, it’s time to slice and enjoy!
Presentation Ideas: Making Your Bars Visually Appealing
To serve your Frosty Apple-Pie Yogurt Bars:
1. Lift and Slice: Use the overhanging parchment paper to lift the entire block of frozen yogurt out of the baking dish. Place it on a cutting board and use a sharp knife to slice it into squares or rectangles. For a cleaner cut, warm the knife slightly under hot water before slicing.
2. Garnish: Consider sprinkling some crushed nuts or a dash of cinnamon on top of the bars before serving for an added touch of flavor and visual appeal. You can also serve them with a drizzle of honey or maple syrup for an extra sweet touch.
Storage Tips: Keeping Your Treats Fresh
Keep any leftover yogurt bars in an airtight container in the freezer. To prevent sticking, place parchment paper between layers of bars. Properly stored, these bars can last up to a month, though you’ll likely want to enjoy them long before then!
Nutritional Benefits of Frosty Apple-Pie Yogurt Bars
These bars are not just a treat; they come packed with numerous health benefits that make them a smart choice for healthy snacking.
Analyzing the Health Benefits
Protein Power: The Importance of Greek Yogurt in Your Diet
Greek yogurt is a standout ingredient in this recipe, known for its high protein content. Each serving provides a significant amount of protein, which is essential for muscle repair and growth. It also helps keep you feeling full longer, making these bars a satisfying snack option.
Fiber and Nutrients from Oats and Apples
Oats and apples contribute to the nutritional profile of these yogurt bars. Oats are an excellent source of soluble fiber, which can help lower cholesterol levels and improve heart health. Apples, rich in vitamins A and C, add natural sweetness and additional fiber, promoting digestive health.
Healthy Fats from Nuts: Why They Matter
If you choose to add nuts, they not only enhance the flavor but also introduce healthy fats and additional protein. Nuts, such as almonds or walnuts, provide omega-3 fatty acids, which are beneficial for heart health and cognitive function. Including nuts makes these bars more filling and nutritious.
Perfect for Various Diets
Gluten-Free and Dairy Options: Making it Accessible for All
For those with dietary restrictions, these Frosty Apple-Pie Yogurt Bars can be easily adapted. Use gluten-free oats and choose a dairy-free yogurt alternative, such as coconut or almond milk yogurt, to accommodate gluten-free and vegan diets. This versatility ensures that everyone can enjoy these delicious bars!
Kid-Friendly Snacking: Getting Children Involved in Healthy Eating
Involving kids in the preparation of these bars can be a fun and educational experience. Let them help with mixing the ingredients or arranging the toppings. These bars are not only nutritious but also a great way to introduce children to healthy eating habits. Plus, their delicious taste will make them a hit with the whole family!
Conclusion
Frosty Apple-Pie Yogurt Bars are not just a delicious treat; they are also a wholesome addition to any diet. With their simple ingredients and easy preparation, they provide a refreshing way to enjoy the flavors of apple pie in a healthier form. By understanding the benefits of each component and following the straightforward steps outlined in this article, you can create a nutritious snack that satisfies cravings while keeping health in mind.
Indulge in these bars for a guilt-free dessert or a revitalizing snack that the whole family will love. With their combination of creamy yogurt, wholesome oats, and sweet apples, these bars are sure to be a staple in your freezer, ready to be enjoyed whenever you need a tasty and nutritious boost!