Crispy Buttermilk Fried Chicken Recipe
Fried chicken is more than just a meal; it’s a culinary experience that evokes feelings of comfort and nostalgia. The crispy, golden-brown exterior gives way to tender, juicy meat that makes each bite a delightful contrast of textures and flavors. Among the myriad of fried chicken recipes, one stands out for its tenderizing qualities and rich flavor: crispy buttermilk fried chicken.
The secret to this delectable dish lies in its marinade. Buttermilk is not just an ordinary ingredient; it plays a pivotal role in transforming the chicken into something truly extraordinary. As the chicken pieces soak in the buttermilk, they absorb moisture and flavor, resulting in a dish that’s not only juicy but also bursting with taste. The lactic acid in buttermilk helps break down protein, making the meat tender while also imparting a subtle tang that elevates the overall flavor profile.
In this article, we will walk you through the process of making crispy buttermilk fried chicken from scratch. You can expect a recipe that yields a crunchy coating, infused with a medley of spices, and succulent chicken that will become a staple in your kitchen. Let’s dive into the magic of buttermilk and how it transforms ordinary chicken into an extraordinary meal.
The Magic of Buttermilk in Fried Chicken
Buttermilk is the unsung hero of fried chicken recipes. Its unique properties make it an essential ingredient for marinating chicken, and understanding its role will help you achieve that perfect fried chicken experience.
When chicken is marinated in buttermilk, the acidity works to tenderize the meat, allowing flavors to penetrate deeply. This process not only enhances the chicken’s natural taste but also ensures that it remains juicy during cooking. The buttermilk creates a protective barrier around the chicken, locking in moisture and ensuring that each piece stays succulent, even after frying.
For those who crave a little heat, adding hot sauce to the buttermilk marinade is a fantastic option. This provides an extra layer of flavor and a spicy kick that complements the savory notes of the fried chicken. Whether you prefer it mild or with a fiery twist, the choice is yours, and it’s all made possible by the versatility of buttermilk.
Ingredients Breakdown
To create crispy buttermilk fried chicken, you will need a selection of carefully chosen ingredients that contribute to the dish’s signature flavor and texture. Here’s a detailed description of the essential components:
1. Chicken Pieces: Choosing the right cuts of chicken is crucial for achieving the ideal texture and flavor. Legs, thighs, wings, and breasts all work well, but darker meat, like thighs and drumsticks, is often preferred for frying due to its higher fat content, which keeps the meat moist.
2. Buttermilk: This creamy ingredient is the cornerstone of the marinade. Buttermilk not only tenderizes the chicken but also infuses it with a rich flavor. If you don’t have buttermilk on hand, you can make a quick substitute by mixing regular milk with a tablespoon of vinegar or lemon juice.
3. Seasonings: A blend of spices is vital for elevating the flavor of your fried chicken. Common seasonings include:
– Paprika: Adds a subtle sweetness and vibrant color.
– Garlic Powder: Delivers a savory depth.
– Onion Powder: Enhances the overall flavor with its mild sweetness.
– Cayenne Pepper: Offers a spicy kick, perfect for those who enjoy heat.
– Thyme: Brings an earthy note that complements the chicken beautifully.
– Salt and Black Pepper: Essential for seasoning and balancing flavors.
4. Flour: The coating for the chicken is crucial for achieving that coveted crispy texture. All-purpose flour is typically used, but you can also mix in cornstarch for extra crunch.
5. Vegetable Oil: The choice of oil for frying can affect the flavor and crispiness of the chicken. Oils with high smoke points, such as canola or peanut oil, are ideal for frying, as they can withstand the high temperatures needed to create a crispy exterior without burning.
Preparing the Chicken: Marination Process
Now that we have covered the essential ingredients, it’s time to prepare the chicken through the marination process, which is key to achieving the perfect crispy buttermilk fried chicken.
1. Combine Ingredients: In a large mixing bowl, pour in the buttermilk and season it with your choice of spices. If you’re opting for a spicy marinade, this is the moment to add your hot sauce. Whisk together until well combined.
2. Marinate the Chicken: Place the chicken pieces into the buttermilk mixture, ensuring they are fully submerged. The goal is to allow each piece of chicken to soak up the flavors and moisture from the marinade.
3. Recommended Marination Time: For optimal results, let the chicken marinate for at least 4 hours, but for the best flavor and tenderness, aim for an overnight soak in the refrigerator. This extended time allows the buttermilk to work its magic, breaking down proteins and ensuring that the chicken is infused with flavor.
4. Coating the Chicken: After marination, remove the chicken from the buttermilk, allowing any excess to drip off. This step is crucial, as too much buttermilk can make the coating soggy.
5. Prepare for Coating: Set up a dredging station with a shallow dish filled with flour and your desired seasonings. Dredge each piece of chicken in the seasoned flour, ensuring an even coating. Press the flour onto the surface for better adherence, and shake off any excess.
This marination and coating process lays the foundation for the crispy buttermilk fried chicken that awaits you. In the next part of this article, we will explore how to create the perfect frying environment to achieve that irresistible crunch, ensuring each bite of your fried chicken is as satisfying as the last. Stay tuned for the continuation of this delicious journey!
{{image_2}}
Instructions for Preparing the Seasoned Flour Mixture
To achieve the perfect crispy buttermilk fried chicken, the seasoned flour mixture is just as vital as the marinated chicken itself. Begin by gathering the following ingredients for your seasoned flour:
– 2 cups all-purpose flour
– 1 tablespoon paprika (smoked or sweet based on preference)
– 1 teaspoon garlic powder
– 1 teaspoon onion powder
– 1 teaspoon cayenne pepper (adjust to taste)
– 1 teaspoon black pepper
– 1 teaspoon salt
Mixing the Flour
In a large bowl, combine the all-purpose flour with the spices. Use a whisk to ensure that the spices are evenly distributed throughout the flour. This step is crucial as it enhances the flavor profile of the chicken and ensures that every bite is seasoned perfectly.
Sifting Flour and Its Impact on Texture
Sifting the flour before mixing in the spices is an excellent practice, though not mandatory. Sifting aerates the flour, which helps create a lighter, crispier crust when fried. If you choose to sift, do so into a separate bowl and then mix in your spices afterward. This additional step can elevate the texture of your fried chicken, making it even crunchier.
Importance of Even Distribution of Spices for Maximum Flavor
When preparing the seasoned flour, it’s essential to ensure that the spices are evenly distributed. This maximizes flavor and ensures that no single piece of chicken is bland. Take the time to mix thoroughly, breaking up any clumps of spices, and ensuring a uniform blend. This attention to detail will pay off with every bite of your fried chicken.
Frying Techniques for Crispy Chicken
Best Methods for Frying Chicken: Deep Fryer vs. Heavy-Bottomed Pot
When it comes to frying chicken, you have a couple of options: using a deep fryer or a heavy-bottomed pot. A deep fryer allows for controlled temperatures and even cooking, which can yield perfectly crispy chicken. However, many home cooks prefer the heavy-bottomed pot method because it is more accessible and often requires less specialized equipment.
If you choose to use a heavy-bottomed pot, ensure it is deep enough to allow for sufficient oil without spilling over when the chicken is added. Aim for at least 3 inches of oil.
Importance of Oil Temperature
Maintaining the correct oil temperature is crucial for frying chicken. Ideally, the oil should be between 325°F and 350°F (165°C to 175°C). If the oil is too hot, the chicken will brown too quickly on the outside while remaining undercooked inside. Conversely, if the oil is not hot enough, the chicken will absorb too much oil, resulting in a greasy texture.
Tips on Achieving and Maintaining the Right Frying Temperature
– Use a Cooking Thermometer: Invest in a reliable cooking thermometer to keep track of the oil temperature accurately. This tool is essential for consistent results.
– Test with a Small Piece: Before adding all the chicken, test the oil by dropping in a small piece. If it sizzles and bubbles immediately, you’re ready to start frying.
– Adjust Heat as Necessary: Keep an eye on the temperature throughout the frying process. You may need to adjust the heat to maintain the ideal temperature range.
Techniques for Frying Chicken in Batches
To avoid overcrowding the pot, which can lower the oil temperature and result in uneven cooking, fry the chicken in batches. This method allows each piece to cook properly and achieve that coveted crispy exterior. Typically, frying in batches of three to four pieces works best, depending on the size of your pot.
Signs that the Chicken is Done
To determine if your chicken is fully cooked, look for several signs:
– Color: The chicken should be a golden brown color on the outside.
– Texture: The crust should look crispy and feel firm to the touch.
– Internal Temperature: Use a meat thermometer to check that the internal temperature has reached 165°F (74°C). This ensures that the chicken is safe to eat and juicy on the inside.
Post-Frying Process: Draining and Resting
Importance of Draining Excess Oil for Crispiness
After frying, it’s essential to drain excess oil from the chicken to maintain its crispy texture. Use a wire rack set over a baking sheet to allow the oil to drip away. Avoid placing the chicken directly on paper towels, as this could trap steam and lead to sogginess.
Recommended Resting Time for Fried Chicken
Let the fried chicken rest for about 10-15 minutes before serving. This resting period allows the juices to redistribute within the meat, helping to keep it moist.
Explanation of How Resting Affects the Final Outcome
Resting your fried chicken is vital for achieving the best texture. This process allows the crust to firm up slightly and any residual steam to escape, keeping the exterior crispy. If you cut into the chicken immediately after frying, the juices will run out, leading to a drier piece of chicken.
Serving Suggestions
Crispy buttermilk fried chicken pairs beautifully with a variety of side dishes that complement its flavors and textures. Here are some classic options:
Coleslaw: Its Crunchy Texture and Tangy Flavor
A fresh coleslaw adds crunch and a tangy contrast to the rich flavors of fried chicken. The crisp cabbage and carrots, combined with a creamy or vinegar-based dressing, bring a refreshing balance to the meal.
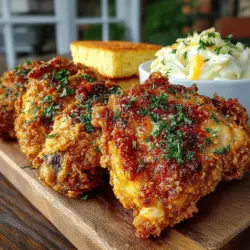
Cornbread: Adding That Southern Touch
No Southern fried chicken meal is complete without a side of cornbread. Its slightly sweet flavor and crumbly texture are the perfect accompaniment to the savory fried chicken. Serve it warm with a pat of butter for an irresistible treat.
Creamy Mashed Potatoes: A Classic Comfort Food Pairing
Creamy mashed potatoes topped with gravy complement fried chicken beautifully. The smooth texture and rich flavor of the potatoes make for a comforting side that pairs perfectly with the crunchy chicken.
Presentation Tips for an Inviting Dining Experience
When serving your crispy buttermilk fried chicken, presentation goes a long way in enhancing the dining experience. Here are some tips:
– Garnish: Consider garnishing your dish with fresh herbs like parsley or thyme for a pop of color. Lemon wedges can also add a fresh touch and a hint of acidity.
– Serving Style: Arrange the fried chicken on a rustic wooden board or a large white platter to create an inviting presentation. Pair it with your chosen sides artfully arranged around the chicken.
– Family Style: Serve the chicken and sides family style, allowing guests to help themselves. This creates a warm, communal atmosphere that encourages sharing and conversation.
Conclusion
Making crispy buttermilk fried chicken at home is not just about following a recipe; it’s an experience filled with joy, satisfaction, and the delight of creating a beloved dish. The combination of marinated chicken, perfectly seasoned flour, and expert frying techniques culminates in a meal that is both delicious and comforting.
As you serve your crispy fried chicken alongside tasty sides, take a moment to relish in the process and the results. The joy of seeing family and friends enjoy a meal you’ve prepared is unmatched.
We encourage you to share your experiences with this recipe with others. Whether you’re a seasoned cook or a novice in the kitchen, this crispy buttermilk fried chicken recipe offers something for everyone to enjoy. Connect with fellow culinary enthusiasts, and let the love for this classic dish bring people together around your dining table. Happy frying!