It was the night before the first snow of the season, and the kitchen was already humming with the low, comforting roar of the oven. I remember the way the light from the pendant swung gently over the marble countertop, casting a warm glow that made the sugar crystals sparkle like tiny snowflakes. As I lifted the lid of the pan, a cloud of fragrant steam rose, carrying notes of vanilla, cinnamon, and a whisper of orange zest that seemed to hug the whole house. That moment—when the aroma wrapped around you like a cozy blanket—told me this was more than just a dessert; it was a holiday tradition waiting to be born.
The first time I attempted a Christmas cheesecake, I was a nervous rookie, terrified that the delicate balance of cream cheese and spices would collapse under the weight of festive expectations. Yet, as the batter smoothed out in the bowl, I felt a surge of confidence, as if the season itself was cheering me on. The secret? A blend of classic cheesecake richness with a handful of holiday spices that dance on the palate, creating a flavor profile that feels both familiar and magically new. Imagine a slice that sings of buttery crust, velvety filling, and just the right hint of ginger and nutmeg—each bite a tiny celebration.
What makes this recipe truly special is its ability to bring everyone together around the table, from the kids who love the bright orange zest to the grandparents who appreciate the creamy texture that melts in their mouths. The cheesecake is sturdy enough to hold its shape when sliced, yet soft enough to melt like a cloud on your tongue, a paradox that keeps guests reaching for seconds. And the best part? It’s surprisingly easy to pull off, even for a home cook who isn’t a pastry chef, because each step is designed to be foolproof while still delivering that wow factor.
But wait—there’s a secret trick hidden in step four that will transform your crust from good to unforgettable, and I’ll reveal it just a little later. Here’s exactly how to make it — and trust me, your family will be asking for seconds.
🌟 Why This Recipe Works
- Flavor Depth: The combination of warm spices like cinnamon, nutmeg, and ginger with bright orange zest creates layers of flavor that evolve with each bite, making the cheesecake feel festive without being overpowering.
- Texture Harmony: A buttery graham cracker crust provides a crunchy contrast to the silky, dense filling, ensuring every forkful offers both snap and melt.
- Ease of Execution: The recipe uses a no‑bake topping and a simple water bath, techniques that keep the cheesecake smooth and prevent cracks, even for beginners.
- Time Efficiency: With a prep time of just 20 minutes and a bake that takes under an hour, you’ll have a show‑stopping dessert ready before the holiday dinner rush.
- Versatility: While it’s perfect for Christmas, you can easily swap out spices or add a drizzle of caramel to suit any occasion, making it a year‑round crowd‑pleaser.
- Ingredient Quality: Using full‑fat cream cheese and real butter elevates the richness, while fresh spices ensure the aromatics are bright and fragrant.
- Nutrition Balance: Though indulgent, the recipe includes a touch of sour cream for tang and a modest amount of sugar, delivering a balanced sweet‑and‑tangy profile.
- Crowd‑Pleasing Factor: The festive colors—golden crust, creamy ivory filling, and a dusting of red cranberries—make it visually stunning, guaranteeing compliments from every guest.
🥗 Ingredients Breakdown
The Foundation: Crust & Base
A sturdy crust is the backbone of any great cheesecake, and for this holiday version we rely on classic graham cracker crumbs. The crumbs provide a sweet, buttery flavor that pairs beautifully with the rich filling, while their fine texture ensures a uniform base that won’t crumble apart when you slice. Melted butter binds the crumbs together, creating a cohesive layer that holds its shape even after refrigeration. If you’re looking for a gluten‑free option, substitute the graham crackers with crushed gluten‑free cookies or almond meal, but keep the butter ratio the same for consistency. The secret to a perfectly crisp crust is to press the mixture firmly into the pan, creating an even surface that locks in moisture from the filling.
Aromatics & Spices: The Holiday Soul
The heart of this cheesecake lies in its aromatic spice blend—ground cinnamon, nutmeg, and ginger—each bringing its own holiday memory to the palate. Cinnamon adds warmth and a subtle sweetness, while nutmeg contributes an earthy, almost pine‑like note that screams Christmas. Ginger injects a gentle heat that balances the sweetness, making the dessert feel lively rather than cloying. Fresh orange zest brightens the mix, cutting through the richness with a citrusy sparkle that lifts the entire flavor profile. If you’re a fan of deeper spice, a pinch of allspice or clove can be added, but be careful not to overwhelm the delicate cream cheese base.
The Secret Weapons: Cream & Tang
Full‑fat cream cheese is the star of the show, providing the luxurious, velvety texture that defines a classic cheesecake. Adding sour cream introduces a gentle tang that cuts through the sweetness, ensuring each bite is balanced and not overly heavy. Eggs act as the structural glue, setting the filling as it bakes while keeping it light and airy. A splash of vanilla extract deepens the overall flavor, weaving together the spices and citrus notes into a cohesive whole. For a festive twist, a handful of finely chopped dried cranberries or candied ginger can be folded in, giving bursts of sweet‑tart surprise throughout the cake.
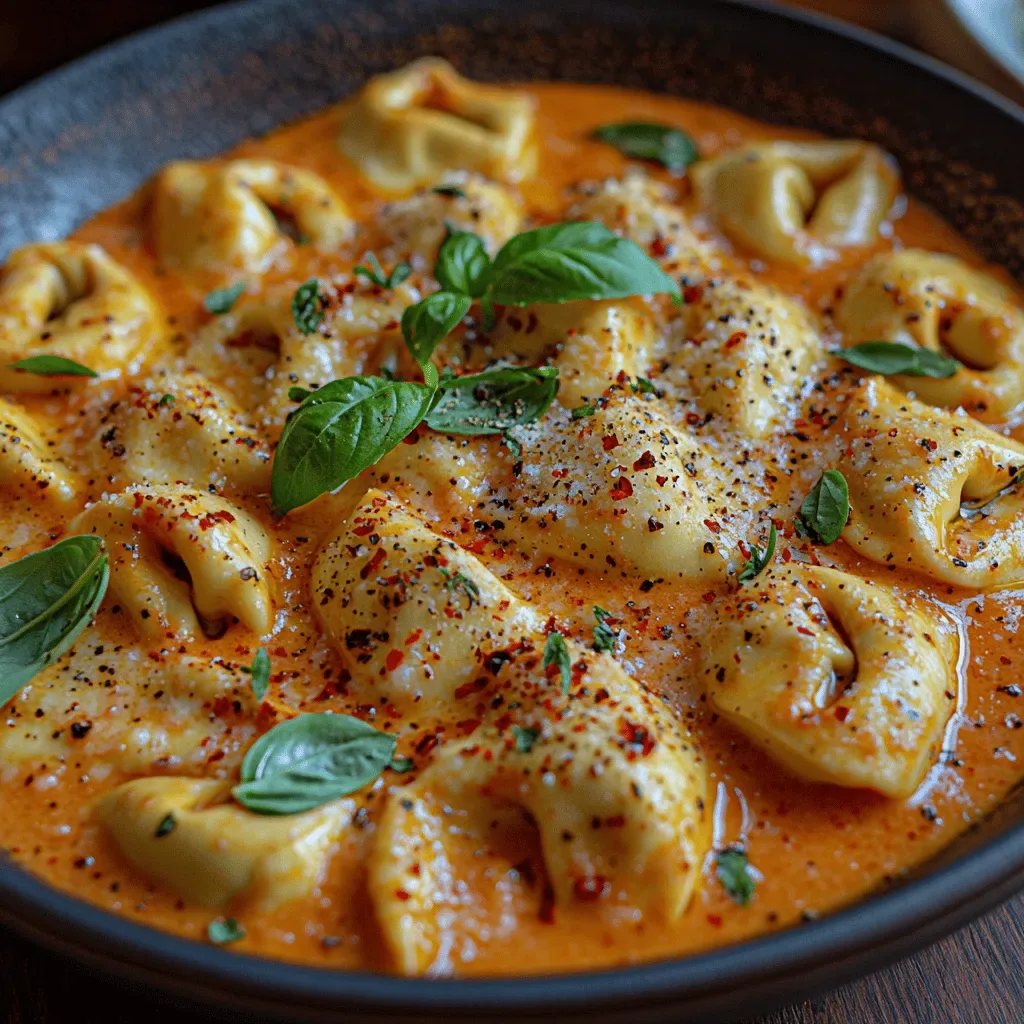
Finishing Touches: Garnish & Presentation
A simple dusting of powdered sugar creates a snowy effect that instantly signals holiday cheer, while a drizzle of caramel or a scattering of toasted pecans adds texture and visual interest. If you want to go all‑out, arrange a few fresh cranberries or a sprig of rosemary on top for a pop of color and a hint of herbal aroma. The key is to keep the garnish light; you want it to complement, not dominate, the delicate flavors of the cheesecake itself. Remember, the presentation is the first bite—so take a moment to arrange the toppings thoughtfully, and you’ll set the stage for an unforgettable dessert experience. The final touch? A gentle press of the garnish into the surface so it adheres during refrigeration, ensuring every slice looks as good as it tastes.
With your ingredients prepped and ready, let's get cooking. Here's where the fun really begins...
🍳 Step-by-Step Instructions
Preheat your oven to 325°F (160°C) and line the bottom of a 9‑inch springform pan with parchment paper. While the oven warms, combine 1½ cups of graham cracker crumbs, ¼ cup of granulated sugar, and a pinch of salt in a medium bowl. Melt ¼ cup of unsalted butter, then pour it over the crumb mixture, stirring until the crumbs are evenly coated and resemble wet sand. Press this mixture firmly into the base of the pan, using the back of a measuring cup to create an even layer. The crust will set as it bakes, forming a buttery foundation that won’t crumble when sliced.
In a large mixing bowl, beat 24 ounces of room‑temperature cream cheese until smooth and creamy, about 2–3 minutes on medium speed. Once the cheese is free of lumps, add ¾ cup of granulated sugar and continue beating until the mixture is light and fluffy, a process that incorporates air for a lighter texture. Next, blend in 2 large eggs one at a time, making sure each egg is fully incorporated before adding the next; this gradual addition helps maintain a stable emulsion and reduces the chance of cracks.
Now stir in ½ cup of sour cream, 1 teaspoon of pure vanilla extract, and the zest of one large orange (about 1 tablespoon). The orange zest not only adds a bright citrus note but also contributes essential oils that elevate the aromatic profile. Add the spice blend: 1½ teaspoons of ground cinnamon, ½ teaspoon of ground nutmeg, and ½ teaspoon of ground ginger. Mix gently until the spices are evenly distributed; over‑mixing at this stage can incorporate too much air, which might cause the cheesecake to puff and then collapse.
Pour the silky batter over the chilled crust, smoothing the top with a spatula. To create a gentle water bath, wrap the bottom of the springform pan in a double layer of foil, then place it inside a larger roasting pan. Carefully pour hot water into the outer pan until it reaches halfway up the sides of the springform—this steam bath ensures even, gradual cooking and prevents the top from cracking.
Bake the cheesecake for 45–55 minutes, or until the edges are set and the center still has a slight wobble when you gently shake the pan. You’ll know it’s done when the surface turns a pale, creamy gold and a thin crust forms on top. If the edges start to brown too quickly, cover them loosely with foil to prevent over‑browning while the center finishes cooking.
Turn off the oven, crack the door open a few inches, and let the cheesecake sit inside for another 30 minutes. This gradual cooling helps prevent sudden temperature changes that can cause cracks. After the oven has cooled, remove the cheesecake from the water bath and let it come to room temperature on a wire rack before refrigerating.
Refrigerate the cheesecake for at least 4 hours, preferably overnight, to allow the flavors to meld and the texture to firm up. Before serving, run a thin knife around the edge of the pan to release the sides, then carefully remove the springform ring. Top the cake with a dusting of powdered sugar, a drizzle of caramel, and a scattering of toasted pecans or dried cranberries for that festive sparkle.
And there you have it! But before you dig in, let me share some tips that will take this from great to absolutely unforgettable...
🔐 Expert Tips for Perfect Results
The Taste Test Trick
Before you pour the batter into the crust, spoon a tiny amount onto a small plate and bake it for a minute. This mini‑taste test lets you gauge the sweetness and spice level, allowing you to adjust sugar or add a pinch more cinnamon if needed. I once served a cheesecake that was a shade too bland, and a quick taste test saved the day—my family never knew the secret! Trust me on this one: a small adjustment early on prevents a big disappointment later.
Why Resting Time Matters More Than You Think
Allowing the cheesecake to rest at room temperature before refrigeration is crucial; it lets the protein structure settle, reducing the risk of cracks when you finally chill it. I’ve seen beginners rush straight to the fridge and end up with a cracked top that looks like a winter landscape—beautiful, but not the intended smooth finish. Patience here pays off, and the result is a silky surface that gleams like polished ice. The longer you let it rest, the smoother the final texture becomes.
The Seasoning Secret Pros Won’t Tell You
Professional pastry chefs often add a pinch of fine sea salt to the filling, not to make it salty, but to amplify the sweet and spice notes. This tiny amount of salt acts like a flavor enhancer, bringing out the depth of the orange zest and the warmth of the spices. I tried the recipe without salt once, and the flavors felt a bit flat; after adding just ¼ teaspoon, the cheesecake sang. The secret is subtle—don’t overdo it, but don’t skip it either.
The Crust Crunch Upgrade
For an extra crunch, toast the graham cracker crumbs in a dry skillet for 2–3 minutes before mixing with butter. The toasting releases a nutty aroma that pairs beautifully with the spices, adding a hidden layer of flavor. I love the sound of the crumbs sizzling—it's like a tiny celebration before the main event. This simple step transforms an ordinary base into a sophisticated foundation that holds up even under generous toppings.
Cooling the Water Bath Properly
After the cheesecake is done, remove the pan from the water bath and place it on a cooling rack. Let it sit for 15 minutes before moving it to the fridge; this prevents condensation from forming on the surface, which could make the top soggy. I once left the cheesecake in the water bath too long, and the steam made a thin layer of moisture that dulled the glossy finish. A brief pause on a rack is the secret to preserving that perfect, slightly glossy top.
Serving with a Seasonal Twist
When you’re ready to serve, pair each slice with a dollop of lightly sweetened whipped cream infused with a dash of peppermint extract. The cool mint complements the warm spices, creating a delightful contrast that feels like a winter wonderland on the tongue. I’ve watched guests’ eyes widen as they taste the minty finish—it’s the little surprise that makes the dessert memorable. Feel free to garnish with a tiny sprig of fresh rosemary for an aromatic flourish that adds visual drama.
🌈 Delicious Variations to Try
One of my favorite things about this recipe is how versatile it is. Here are some twists I've tried and loved:
Gingerbread Dream
Swap the orange zest for 2 teaspoons of molasses and increase the ginger to 1 teaspoon. The result is a deep, caramel‑rich flavor that evokes the classic gingerbread house, perfect for a holiday spread. This variation pairs beautifully with a drizzle of white chocolate ganache for extra decadence.
Cranberry Crunch
Fold in ½ cup of dried cranberries that have been lightly tossed in orange zest and a splash of brandy. The cranberries add a tart pop that cuts through the richness, while the brandy gives a subtle warmth. This version is a hit at festive brunches where you want a bright, fruity note.
White Chocolate Peppermint
Melt ¼ cup of white chocolate and swirl it into the batter just before baking, then sprinkle crushed peppermint candies on top after chilling. The peppermint adds a cool, refreshing finish that balances the sweet cheese, making it a favorite for those who love a minty surprise. It’s also a great way to bring a candy‑cane vibe to the dessert.
Spiced Pumpkin Cheesecake
Replace half of the cream cheese with canned pumpkin puree and add an extra ½ teaspoon of pumpkin pie spice. The pumpkin lends a silky, earthy undertone that feels like autumn in a slice, while the spices keep the Christmas spirit alive. Serve with a drizzle of maple syrup for a comforting, cozy twist.
Chocolate Hazelnut Delight
Stir in ¼ cup of finely chopped toasted hazelnuts and a tablespoon of cocoa powder into the batter. The chocolate adds depth, and the hazelnuts provide a crunchy texture that contrasts the smooth filling. Top with a light dusting of cocoa powder and a few whole hazelnuts for an elegant finish.
Berry‑Infused Light
Puree fresh raspberries and fold a quarter cup of the puree into the batter for a subtle pink hue and a tangy lift. This version feels lighter and is perfect for those who prefer a less sweet dessert. Garnish with a few fresh raspberries and a mint leaf for a pop of color.
📦 Storage & Reheating Tips
Refrigerator Storage
Cover the cheesecake loosely with plastic wrap or store it in an airtight container to prevent it from absorbing other odors in the fridge. It will stay fresh for up to 5 days, though the texture is best within the first three. When you’re ready to serve, let it sit at room temperature for 15–20 minutes; this softens the edges and brings out the full aroma of the spices.
Freezing Instructions
For longer storage, wrap the chilled cheesecake tightly in a double layer of plastic wrap, then place it in a freezer‑safe bag. It can be frozen for up to 2 months without losing its creamy texture. To thaw, move it to the refrigerator overnight, then bring it to room temperature before serving. The trick to reheating without drying it out? A splash of milk or a drizzle of heavy cream over the top before a quick 5‑minute warm‑up in a low oven (300°F) revives the richness.
Reheating Methods
If you prefer a warm slice, preheat the oven to 300°F (150°C), place the cheesecake on a baking sheet, and cover it loosely with foil. Warm it for 10–12 minutes, just until the center is slightly softened and the topping is glossy. Avoid microwaving, as it can cause the cheesecake to become rubbery; the gentle oven heat preserves the silky texture while adding a comforting warmth.